When it comes to building a shelter for survival, there are many different options out there. But, if you’re looking for an easy shelter to build, the answer is simple: a tarp shelter.
A tarp shelter is one of the easiest and most affordable shelters to build. All you need is a tarp and some rope or string, and you can create a shelter in no time. You can also make a tarp shelter with just two trees and a rope.
Tarp shelters can be used to protect you from the elements, whether it’s wind, rain or snow. They make an excellent temporary or emergency shelter, and can be set up almost anywhere.
You can set up a tarp shelter in as little as five minutes. First, you’ll need to select a suitable spot. Make sure it’s flat and clear of debris, as this will help the tarp to stay in place. Then, choose a tree or other object to tie your tarp to. Once you have both of these elements in place, tie the tarp to the object using your rope or string. You may need to loop the rope or string around the object multiple times to ensure that the tarp is secure.
Once the tarp is tied down, you can use additional rope or string to raise the edges of the tarp to create a peak. This peak will help to protect you from the wind and rain. Depending on the size of your tarp, you may want to use two or even three trees to create a larger shelter.
The great thing about tarp shelters is that they can be easily dismantled and moved to another location if necessary. Plus, they don’t require any special tools or materials, which makes them perfect for emergency situations.
If you’re looking for the easiest shelter to build, a tarp shelter is a great option. With just a tarp and some rope or string, you can have a shelter set up in minutes. Plus, they can be used to provide protection from the wind, rain and snow, making them a great choice for any outdoor adventure.
Survival Shelters
Survival shelters are essential for anyone who is planning to spend time outdoors, and there are many different types of shelters to choose from. From round lodges to quinzhees, snow caves to tarp tipis, each type of shelter offers its own set of benefits.
To help you decide which shelter is best for your survival, let’s take a closer look at some of the most popular survival shelters on the market.
Round Lodge: Round lodges are a classic type of survival shelter that have been used for centuries. They offer excellent protection from the elements, and are relatively easy to construct and maintain. The biggest downside is that they tend to be rather large, making them difficult to transport.
Ramada: Ramadas are an excellent all-weather shelter. They are lightweight, easy to set up, and offer great protection from all elements. The only real downside is that they lack the insulation of some other types of shelters.
Quinzhee: Quinzhees are a unique type of shelter that are constructed by digging down into the snow and then covering it with a layer of snow. They are relatively easy to construct and provide excellent protection from the elements. The main downside is that they are quite small, making them unsuitable for larger groups.
Snow Cave: Snow caves are an excellent option for those looking for a shelter that provides complete protection from the elements. They are relatively easy to construct and provide excellent insulation, but they require a great deal of digging, which can be laborious and time-consuming.
Wedge Tarp Shelter: Wedge tarp shelters are large, lightweight shelters that are designed to provide protection from the elements and keep you dry. They are relatively easy to set up and maintain, but the lack of insulation can make them a bit uncomfortable in colder climates.
Tarp Wing: Tarp wings are a great option for those who are looking for a lightweight and versatile shelter. They can be easily set up and taken down and provide excellent protection from the elements. The biggest downside is that they are not as well insulated as some other types of shelters.
Tarp Burrito: Tarp burritos are a unique type of shelter that are constructed by wrapping a tarp around the body. They are lightweight and provide excellent protection from the elements, but they can be a bit uncomfortable in colder climates.
Tarp Tipi Shelter: Tarp tipi shelters are large, dome-shaped shelters that are designed to provide complete protection from the elements. They are relatively easy to set up and provide excellent insulation, but they can be difficult to move around and set up in different locations.
A-Frame Tarp Shelter: A-frame tarp shelters are a great option for those who are looking for a lightweight, easy-to-set-up shelter that provides excellent protection from the elements. The main downside is that they are not as well insulated as some other types of shelters.
Shelter Rock Shelters: Shelter rock shelters are large, rock-based shelters that are designed to provide complete protection from the elements. They are difficult to construct and require a great deal of digging, but they provide excellent insulation and protection from the elements.
Desert Tarp: Desert tarps are large, lightweight tarps that are designed to provide complete protection from the elements. They are relatively easy to set up, but the lack of insulation can make them uncomfortable in colder climates.
No matter what type of shelter you choose, it’s important to make sure that it provides adequate protection from the elements and keeps you comfortable. With the right survival shelters, you can stay safe and warm in any type of weather!
Shelter Construction
Shelter construction is an important part of creating a safe and secure environment for people in need. From homeless shelters to emergency shelters for natural disasters, shelters provide a place for people to rest and recover. Whether you’re constructing a shelter for a homeless shelter or an emergency shelter, there are many factors to consider.
When constructing a shelter, it’s important to consider the environment. Will the shelter be exposed to extreme temperatures or storms? Will the environment require a sturdy and durable structure? Will the shelter need to protect against predators? These are all important considerations when planning a shelter construction project.
When planning a shelter, the size of the shelter is another factor to consider. The size of the shelter needs to be big enough to house the number of people you plan to accommodate. But the size of the shelter must also be small enough to be manageable and to fit in the area where it’s being built. You also need to consider the type of materials you will use to construct the shelter. Different materials offer different levels of protection and durability.
Once you’ve decided on the size and type of materials for your shelter, you should plan the layout of the shelter. You need to consider the space needed for sleeping areas, bathrooms, kitchen, and other amenities. You should also consider the location of the shelter in relation to the outside elements. For example, if it’s located near a river, you’ll need to consider how to protect the shelter from flooding.
Finally, you should consider the safety features you’ll need in the shelter. This includes fire alarms, smoke detectors, and other emergency features. You should also consider how you’ll provide access to the shelter, such as doors and windows.
Shelter construction is a complex project that requires careful planning and consideration. From environment to size and materials, there’s a lot to consider when constructing a shelter. However, with careful planning and consideration, you can create a safe and secure environment for those in need.
Tips For Building A Basic Shelter
Building a shelter is one of the most important survival skills that anyone can possess. Whether you find yourself stuck in the wilderness, or in the urban environment, being able to create a safe and secure shelter is essential. Here are some tips to help you build a basic shelter quickly and effectively.
1. Select the right location. When building a basic shelter, it’s important to choose a spot that’s sheltered from the elements. Look for an area that is flat, away from standing water, and is well-drained. Also, try to find a spot that has some natural protection from the wind and rain.
2. Collect the materials. Depending on the environment you’re in, your materials for building a shelter may vary. If you’re in the woods, you can use logs and branches for the frame. If you’re in a more urban setting, you can find discarded items like cardboard boxes, plastic tarps, or pallets.
3. Create a frame. Once you’ve gathered your materials, you’ll need to create a frame for your shelter. This can be done by stacking logs in a triangle or rectangle shape. Alternatively, you can use two logs to create an A-frame, or you can use four logs to create a box frame.
4. Add insulation. To make your shelter more insulated, use leaves, pine needles, grass, or other natural materials. These will help to keep you warm and dry, and will also help to keep the shelter stable.
5. Cover the shelter. Now you’ll need to cover the shelter with a waterproof material. If you’re in a wooded area, you can use tree bark or large leaves to create a waterproof covering. If you’re in an urban setting, you can use plastic tarps, cardboard boxes, or pallets.
Building a basic shelter can be a challenge, but following these tips can help you create a safe and secure shelter in any environment. With a little bit of preparation and knowledge, you can be sure that you’ll have a safe place to rest and survive.

Shelter Building 101
Shelter building is an important skill to have in any outdoor setting. Whether you are camping, hiking, or in a survival situation, having the ability to construct a shelter is essential. With the right materials and knowledge, you can build a shelter that will keep you safe and dry in the most extreme of conditions.
In this blog post, we’ll be covering the basics of shelter building. We’ll look at the different materials you’ll need, how to construct the shelter, and techniques for making the shelter as comfortable and sturdy as possible. We’ll also discuss the importance of shelter building and the ways it can help you in any outdoor setting.
First, let’s go over the materials you’ll need to build a shelter. Depending on the location, you might need to gather sticks, leaves, grass, stones, and other natural materials. You may also need tarps, plastic sheeting, and poles to help you construct the shelter. Make sure to bring along a knife or multi-tool to make cutting and tying easier.
Once you have the materials, the next step is to figure out the best way to construct the shelter. There are a few basic steps that are used for most shelters. First, make sure to create an internal frame for the shelter. This will provide the main support for the shelter and will help you keep the shelter in place.
Next, use the materials you gathered to create walls. You can use sticks, leaves, and other natural materials to create the walls of the shelter. If you have plastic sheeting or tarps, you can use these to help create a waterproof covering. Finally, use the materials to make a roof. Try to make the roof sloped in order to help water run off the sides of the shelter.
When you have the shelter constructed, it’s time to make it comfortable. Once you’re inside, use leaves and grass to create a floor and insulation. You can also use rocks and sticks to create a fire pit. Finally, use your knife or multi-tool to make doorways and windows that can be opened and closed to adjust the temperature inside the shelter.
Shelter building is an important skill to have in any outdoor setting. It can help you stay safe and dry in any condition, and it can be the difference between life and death in a survival situation. With the right materials and knowledge, you can build a shelter that will keep you safe and comfortable in any environment.
A Quick Guide to Shelter Building
In this article, we will be talking about how to make your own easy shelters. These easy shelters do not require too much advanced knowledge or materials either. If you have ever wanted to start building with us before, now is the time!
Shelters are an incredible way to protect yourself from the elements and create some cozy getaways for yourself. They can even become your new favorite way to spend your free time when you add some personal touches to them.
Many people begin by gathering some old blankets and sheets they don’t use anymore and putting up these makeshift walls in their home or backyard.
What are 3 basic types of survival shelters?
One of the most fundamental building concepts is shelters. A basic or first level shelter consists of only one main component- cover!
A roof is one major part of any shelter you will make. Most preppers start out by making a simple tent, which are typically made from canvas or leather blankets. These are good starting points as they have us covered in terms of protecting against water and light, but very little else!
More advanced survivors invest in additional materials and components to enhance their protection levels beyond just shade. They add more insulation, create tighter seals to prevent air infiltration, and use waterproof fabrics to keep dry.
The hardest thing about constructing a shelter is deciding where to put the door! Depending on your terrain and environment, you can choose between vertical doors, horizontal ones, or even both!
Vertical entry doors work best when access is limited – like during an earthquake or tornado. Horizontal sliding glass doors are great for protecting outside areas such as a house or cabin. Just remember that it takes time to construct these so they are not easy to pull out quickly!
That being said, there are many ways to protect yourself with nothing more than your own two hands and some natural resources nearby! If you do not have either, then at least go look somewhere it is known to be safe and see what you can salvage.
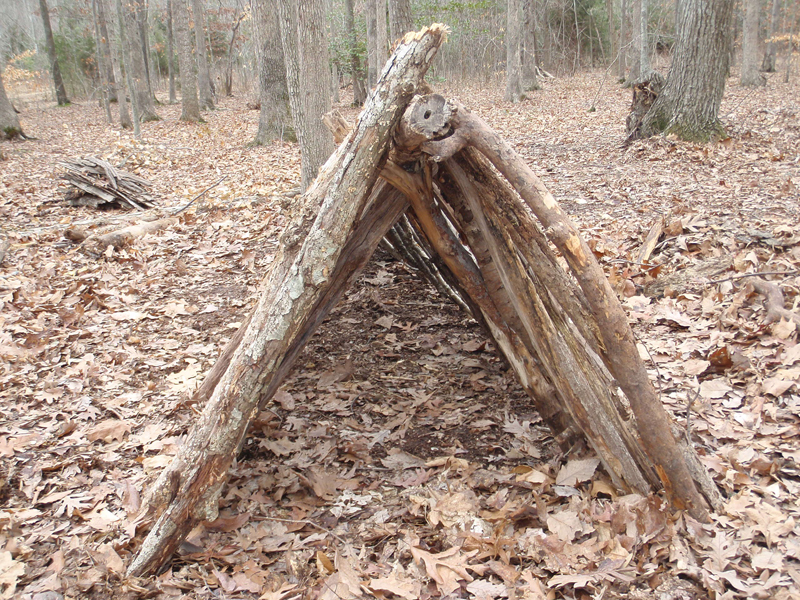
A-frame tarp shelter
The A-frame tarp shelter is one of the quickest and easiest types of shelter you can build. All you need is a tarp, some rope, and some trees or poles to string it up on. This type of survival shelter provides basic protection from the wind and rain, and can be built quickly in the event of an emergency.
Lean-to
A lean-to shelter is another basic type of survival shelter that can be constructed quickly, and with minimal materials. This type of shelter is versatile, and can be built against a variety of surfaces such as trees, rocks, or even the ground. To build a lean-to, you will need two long poles and some rope. The poles will be used to form a triangular frame to hold the tarp or fabric over the opening. The origin of the lean-to shelter dates back to the late 19th century, when it was used by Native Americans as a temporary shelter during hunting trips. The lean-to shelter provides a simple and effective shelter from the elements, such as wind and rain. It is also lightweight, making it easy to transport.
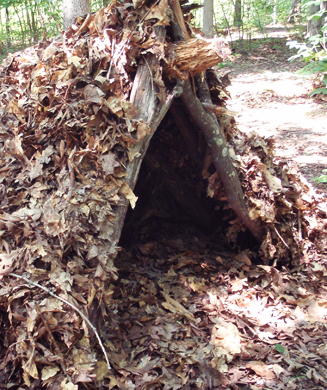
Debris Hut
The last of the three basic types of survival shelters is the debris hut. This type of survival shelter is more complex, but it can provide better protection from the elements. To build a debris hut, you will need some kind of material such as leaves, twigs, and branches to form a roof and walls. Once the structure is complete, you can then cover the walls and roof with more debris to create a waterproof barrier.
Build a Simple Lean To
In building your own lean-to, or even just using an existing one as a model, you can start with making it longer and then make it wider. Starting with only 1 wall being very long and 2 walls that are each shorter than the length of the space they cover is what I would call a “lean” style structure.
This type of shelter is the most basic and easy to understand. It takes advantage of the strength of having two separate walls meet at a 90 degree angle. This creates more stable interior spaces for protecting things like blankets and sleeping bags from rain or snow.
Since this article focused on hard surfaces, let’s go ahead and add some softness by incorporating louvered panels into these shelters. Louvers are small openings between larger pieces of material. They create little passageways through the shelter while still giving you solid protections in all directions.
You can buy plastic louver panel materials in many places including craft stores and online vendors.
Build a Pole Barn
While building your own home or buying a pre-built one is definitely the way to go, there is another very practical option when you are looking for some additional space — a pole barn! A pole barn comes with built in walls and roofs that can be removed, so they are not limited to only being used as shelter during storms or winter season.
Pole buildings are typically framed using steel tubing or wood board studs. The roof and wall materials are then attached to the frame like cabinetry would be.
Because it has insulated walls and a solid roof, a pole barn can usually keep out colder weather better than just a canvas tent or tarp lined structure. This is important if you want to use it for hunting or other outdoor activities during cold seasons.
There are many brands that make quality prefabricated pole barns that can help you find the size, shape, and features that match yours. They may even offer financing options so that coming up with the final money is easy.
Build a Concrete Block House
The next most easy way to start prepping is by building a concrete block house. These are very popular because they use up little energy in terms of needed supplies and you can make them yourself at home!
Concrete block houses were first used as an effective shelter during WWII when there was no electricity or running water. Since then, they have become one of the more common ways to begin practicing survival skills.
You will need about 20 pounds of dry cement per 1,000 square feet for these homes, so do not underestimate this requirement!
These blocks can be made into many different shapes and sizes depending on your desired interior space and how high you want the walls to be. Some even combine multiple rooms together inside one large structure!
By having separate room spaces, it becomes easier to organize the resources according to each person’s needs. This also helps preserve the individual’s sense of self-organization since they can easily move things around if necessary.
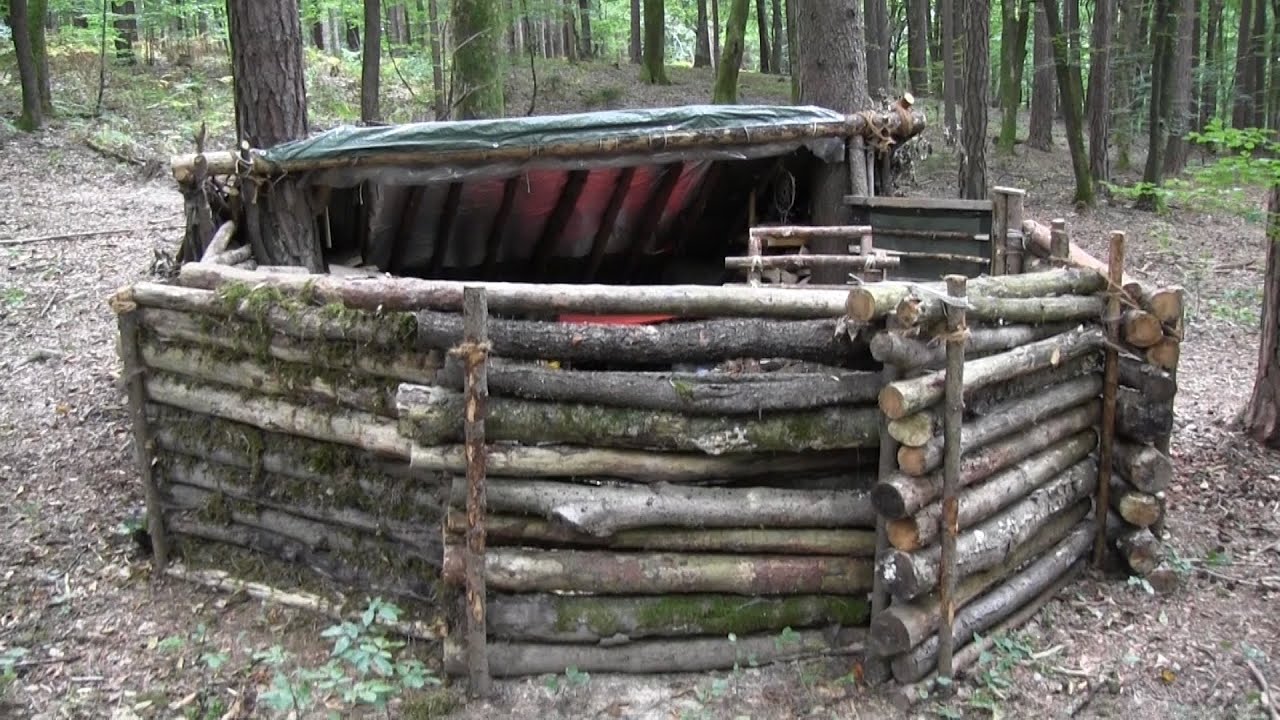
Build a Round Lodge
Building a round lodge may seem like an intimidating task, but with a few tips and tricks, you can create a beautiful and functional haven for your family or group of friends. The first step to building a round lodge is to find the perfect spot. This can be in the woods, on a lake, or even near a beach. When you have the perfect spot, the next step is to carefully plan the design of the lodge.
When it comes to the design, there are several options to choose from. You can create a modern lodge with a contemporary feel, or a rustic lodge with a cozy and homey atmosphere. You can also choose a design that incorporates traditional elements, such as a large fireplace or an outdoor fire pit. No matter what design you choose, make sure it fits your needs, tastes, and budget.
Building a round lodge is a great way to create a unique and special getaway for your family or friends. With a little bit of planning, patience, and creativity, you can create a beautiful and functional haven for an unforgettable experience.
How do you make a snow cave shelter?
Winter is here, and with it comes the beauty of snow. But snow can also be a lifesaver in a pinch. If you ever find yourself lost in the wilderness during the cold winter months, you may have to resort to creating a snow cave shelter. Making a snow cave shelter is a great way to stay warm and protected from the elements when you’re stranded in the great outdoors.
The first step to making a snow cave shelter is to find the right spot. You want to look for a large snowdrift that is at least four feet deep and where the sun is not directly shining. Once you’ve found the perfect spot, you’ll need to start digging.
Using a shovel or something similar, start digging out a rectangular hole that is about three feet wide, two feet tall and four feet deep. Once you’ve got the hole dug out, start lining it with branches and other debris to create a bed and a roof. Make sure that you leave a small opening at the top of the shelter to allow air to circulate and the snow to vent.
Once you have the shelter ready, you can start to build the walls. Gather snow from the outside of the shelter and use it to create a thick barrier around the shelter. You can use branches or other materials to hold the snow in place, or you can use a snow saw to cut the snow into blocks and stack them. Make sure that the walls are at least 18 inches thick all the way around.
Now that you have the shelter all built, you can start to furnish it. Bring a sleeping bag, some blankets, and other gear to make the shelter more comfortable. You can also create a small fire pit for warmth and cooking. Make sure that the fire is small and contained and that you have the proper supplies to put the fire out if necessary.
Making a snow cave shelter is a great way to stay warm and safe in the winter wilderness. With a little bit of effort and the right supplies, you can make a shelter that will keep you safe and warm until you find your way back home.