Introduction
Water is essential for life. A main component of the human body, water flushes toxins from vital organs, carries nutrients to cells, and provides a medium in which biochemical reactions take place. In short, we cannot live without it.
While most of us have access to clean drinking water from the tap, there are situations where this may not be possible or safe. Whether you are faced with a natural disaster or simply want to be prepared for one, learning how to properly store water for emergency situations is crucial.
One way to do this is by canning water. Canning is a method of preserving food in which the food contents are processed and sealed in an airtight container. This process can be used for both high-acid foods (such as fruits) and low-acid foods (such as vegetables and meats).
While canning has been around for centuries, the modern home canning process became popular in the early 1800s with the invention of mason jars. This made it possible for people to preserve food at home using a simple boiling method.
Today, there are two different types of home canning methods: water bath canning and pressure canning. Water bath canning is only recommended for high-acid foods, while pressure canning can be used for both high-acid and low-acid foods.
Canning water is a simple process that requires only a few supplies: mason jars with lids and rings, a large pot (for boiling the jars), a funnel, and a ladle. You will also need to purchase pure distilled water; do not use tap water as it may contain impurities that could contaminate your canned water supply.
What You Need to Know Before You Start
Water is one of the most basic and essential ingredients in canning. That’s because the canning process itself relies on water to work.
Canning is a method of food preservation that uses heat to kill bacteria and sealed jars or cans to prevent re-contamination. The heat drives the oxygen out of the food and creates a vacuum seal as the jars cool. This seal prevents new bacteria from getting in and contaminating the food.
To create this seal, you need to use boiling water. That’s why it’s important to start with fresh, clean water that has been brought to a boil. If you are using tap water, be sure to let it boil for at least five minutes before starting your canning project.
Boiling water will also help to remove any impurities from your jars or cans. Be sure to sterilize all of your canning equipment before you start, including your jars, lids, and rings. You can do this by boiling them for 10 minutes in a large pot of water.
Once you have everything sterilized and ready to go, you can begin the canning process. Be sure to follow all recipes carefully and pay attention to processing times. If you are unsure about anything, it’s always better to err on the side of caution and give your food a little extra time in the canner.
Water Bath Canning Water for Emergencies
Canning is a great way to preserve food, but it can be tricky to get the process right. Water bath canning is a popular method for canning fruits and vegetables, and it’s relatively simple to do. Here’s a step-by-step guide to water bath canning water.
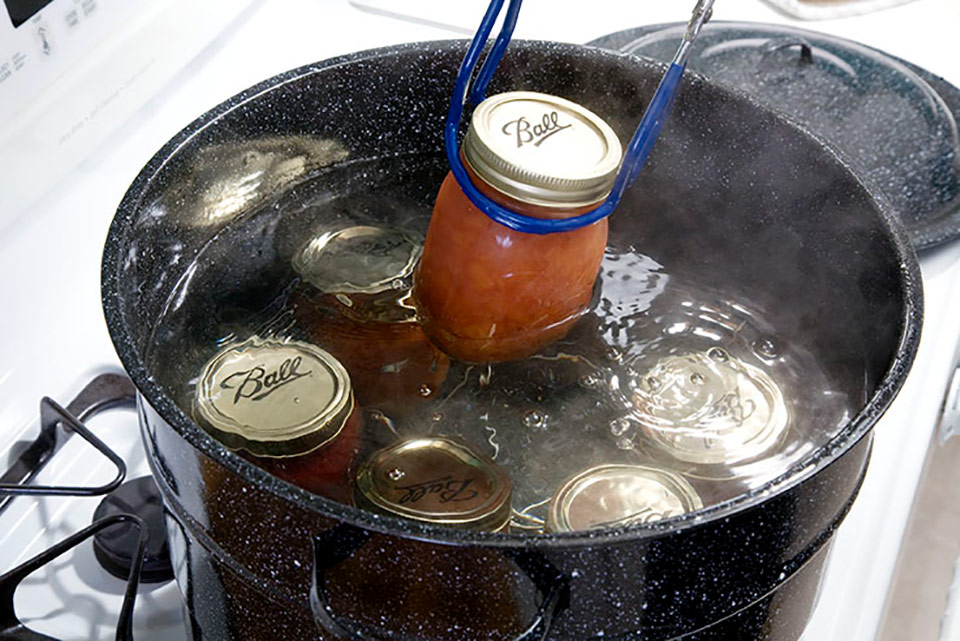
1. Fill a large pot with water and place it on the stove.
2. Place your jars in the pot, making sure they’re covered with at least an inch of water.
3. Bring the pot of water to a boil.
4. Once the water is boiling, turn off the heat and let the jars sit in the hot water for 10 minutes.
5. Carefully remove the jars from the pot and place them on a towel to cool.
6. Once the jars are cool, you can start filling them with your canned goods.
7. Make sure to leave an inch of headspace at the top of each jar.
8. Once the jars are full, screw on the lids and place them back in the pot of boiling water.
9. Process the jars for 10 minutes.
10. Carefully remove the jars from the pot and place them on a towel to cool.
Once the jars are cool, you can store them in a cool, dark place for up to a year.
Water-Bath Canning Step-by-Step Guide
Water Bath Canning is a canning method that uses boiling water to create a vacuum seal. This method is best for high-acid foods such as fruits, jams, and jellies. Water bath canning is a simple process and only requires a few supplies.
-Water bath canner
-Canning jars
-Canning lids and rings
-Jar lifter
-Funnel
-Ladle
-Timer
Ingredients:
-Fresh fruits or vegetables
-Canning salt
-Water
-Sugar (optional)
Step 1: Fill the canner halfway with water and heat it to boiling.
Step 2: Wash canning jars and lids in hot, soapy water. Rinse well.
Step 3: Place canning jars in the canner, making sure they are covered with at least 1 inch of water.
Step 4: Bring the canner to a rolling boil.
Step 5: Prepare fruit or vegetables according to the recipe.
Step 6: Ladle hot fruit or vegetables into hot jars, leaving 1/2 inch headspace.
Step 7: Remove air bubbles with a non-metallic utensil.
Step 8: Wipe jar rims clean with a damp cloth.
Step 9: Place canning lids on jars and screw on rings until fingertip tight.
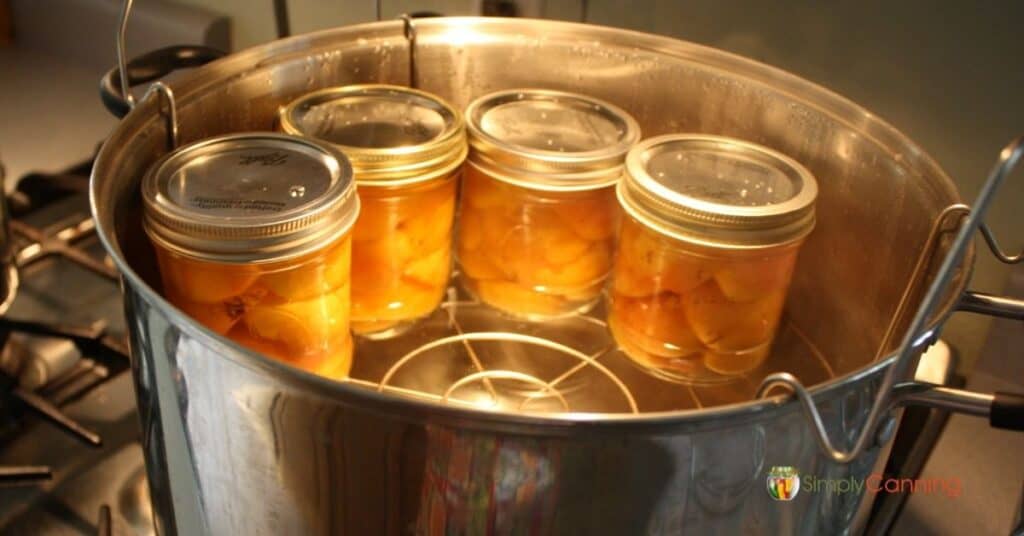
Step 10: Lower jars into canner, making sure they are covered with at least 1 inch of water.
Step 11: Bring the canner to a rolling boil and process for the time specified in the recipe.
Step 12: Turn off the heat and allow the canner to cool for 5 minutes.
Step 13: Remove jars from the canner and place them on a towel to cool.
Step 14: Check seals after jars have cooled. Sealed jars can be stored for up to 1 year.
The Canning Process

Before you begin any canning project, it is important to understand the process. Canning is a method of preserving food in which the food is processed and sealed in an airtight container.
The canning process kills bacteria and other microorganisms that can cause food to spoil. It also prevents oxygen from entering the container, which can cause the food to deteriorate.
Canning is a safe and effective way to preserve food if it is done correctly. There are two methods of canning: water bath canning and pressure canning.
Water bath canning is best suited for high-acid foods, such as fruits, tomatoes, pickles, and jams. High-acid foods contain enough acid to prevent the growth of bacteria during processing.
Pressure canning is necessary for low-acid foods, such as vegetables, meats, and poultry. Low-acid foods do not contain enough acid to prevent the growth of bacteria during processing. Pressure canning sterilizes the food by destroying bacteria that may be present in the food or in the air inside the sealed container.
Canning Water Safety
Canning water is a necessary part of preserving food. The boiling process kills bacteria and other organisms that can cause spoilage. However, if not done properly, home canned water can pose a serious health risk.
There are two types of water that can be used for canning: tap water and distilled water. Tap water is generally safe to use as long as it is from a clean source and has been treated to remove any impurities. Distilled water is preferred, as it does not contain any minerals that could potentially contaminate the food.
When canning water, it is important to follow all safety guidelines to ensure that the food will be safe to eat. Be sure to sterilize all jars and lids before use, and boil the water for at least 10 minutes before adding it to the jars. Be sure to screw on the lids tightly, and processed the jars in a hot water bath for the prescribed amount of time.
If you have any questions or concerns about canning water, be sure to consult with a reliable source such as your local extension office or the USDA National Center for Home Food Preservation.
How to Can Water for Emergencies?
When an emergency strikes, one of the first things you’ll need is a supply of clean water. If you don’t have a way to filter or purify water, you can still store it for later use. Canning water is a simple and effective way to do this, and it only requires a few supplies.
The process is simple: just fill clean jars with tap water, leaving an inch of headspace at the top. Screw on the lids, and place the jars in a boiling water canner. Process the jars for 30 minutes, then remove and let cool.
Once they’re cooled, check the seals on the lids. If they’re still intact, the jars are sealed and the water is safe to use. Store the jars in a cool, dark place, and they’ll be good for up to a year.
In an emergency, you can use the canned water for drinking, cooking, or even bathing. Just be sure to boil it first to kill any bacteria that may have survived the canning process. With a little preparation, you can rest assured that you’ll have a safe supply of water, no matter what comes your way.
How much water do I need to can for an emergency?
We all know that water is essential for survival. But in an emergency situation, how much water should you have on hand?
The rule of thumb is to have at least one gallon of water per person, per day. But depending on the situation, you may need more.
For instance, if you live in a hot climate, you’ll need more water to stay hydrated. If you’re evacuating your home, you’ll need enough water for everyone in your family, plus pets. And if you’re stranded in your car, you’ll need even more.
So, how do you make sure you have enough water in an emergency?
The best way is to have a water filter and purification system in place. That way, you can have access to clean water, even if your tap water is contaminated.
Another option is to stock up on bottled water. But keep in mind that you’ll need a lot of it, and it can be expensive.
You can also collect rainwater. But again, you’ll need a way to filter it before you drink it.
The bottom line is, you can never have too much water in an emergency situation. So, it’s always better to err on the side of caution.
How long will canned water last?
This is a question that we get asked a lot, and it’s one that doesn’t have a definitive answer. It really depends on a number of factors, such as the type of can, the storage conditions, and the content of the water.
Here are a few things to keep in mind when trying to determine how long your canned water will last:
-The type of can: Cans come in different materials, such as steel, aluminum, and even plastic. Each type of can has different properties that can affect how long the water inside will stay fresh.
-The storage conditions: Canned water should be stored in a cool, dry place. If it’s stored in a hot environment, the water inside can spoil more quickly.
-The content of the water: If the water has a lot of dissolved minerals, it can affect how long it will stay fresh.
With all of these factors to consider, it’s tough to say how long canned water will last. However, if you follow these guidelines, you can be sure that your canned water will stay fresh for a long time.
FAQs
Canning water is a great way to ensure that you have clean, safe drinking water on hand in case of an emergency. But before you start canning water, there are a few things you should know. Here are answers to some frequently asked questions about canning water:
Does canning water purify it?
No, canning does not purify water. However, it does ensure that the water is safe to drink by killing any bacteria or other contaminants that may be present.
How do I know if my cans of water are still good?
To check the quality of your canned water, open a can and inspect the contents. If the water is cloudy or has an off odor, do not use it. Discard any canned water that shows signs of contamination.