Building a permanent shelter in the wilderness is a great way to make sure you’re protected from the elements and can stay safe on your long-term adventure. Whether you’re camping, trekking, or just exploring the outdoors, having a sturdy, reliable shelter is essential.
What Is a Long Term Survival Shelter?
A long-term survival shelter is a shelter designed to withstand the elements and to provide safe and secure shelter and sustenance for a prolonged period of time. They are typically used in extreme weather conditions, such as during natural disasters, when people need to be able to sustain themselves and their families for a long period of time.
Long-term survival shelters are typically made from durable, waterproof materials, such as steel, wood, and plastic. They are designed to be resistant to wind, rain, and snow, and to provide a comfortable and safe environment for that inside. Many of these shelters feature built-in generators, allowing for electricity and other modern amenities.
A basic long term survival shelter can consist of an insulated tent, sleeping bags, and a source of heat, like a campfire or a portable stove. However, more complex shelters are available, with features such as showers and toilets, as well as storage space for supplies and equipment.
Long-term survival shelters can be used in a number of different situations. They are often used in wilderness areas, in remote locations, or in areas prone to natural disasters. They are also used by hikers and campers who need shelter for an extended period of time.
No matter what the situation, long-term survival shelters provide a safe and secure place to stay for an extended period of time. They are an invaluable resource for those who are in the wilderness or in an area prone to natural disasters. If you are looking for a shelter that can provide shelter and sustenance for a prolonged period of time, a long-term survival shelter is a great option.
Steps to Building a Permanent Shelter in the Woods
Building a permanent shelter in the woods can be a great way to escape from the hustle and bustle of everyday life, as well as a great way to practice primitive living skills. Whether you’re looking for a rustic escape for yourself or for your family, building a permanent shelter in the woods is a great way to explore nature, relax, and get away from it all.
Choosing a Location
The most important step in building a permanent shelter in the woods is choosing the right location. It’s important to select a spot that is sheltered from the wind and has plenty of trees for protection from the elements. When choosing a location, you’ll also want to make sure there’s plenty of space for you to build your shelter.
Choosing the Best Permanent Shelter
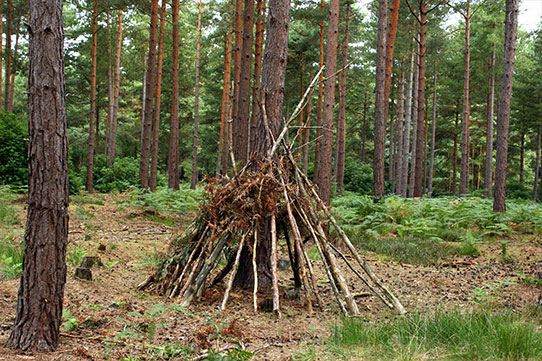
Once you’ve selected a location, it’s time to choose the type of shelter you would like to build. There are three main types of permanent shelters you can build in the woods: lean-to, wickiups, and cabins. All three of these shelters have their own unique benefits and drawbacks, so you’ll want to consider all of them before making a decision.
Lean-to Shelter
A lean-to shelter is the simplest and easiest type of shelter to build in the woods. It’s also the most affordable and can be built with minimal supplies. The only downside to a lean-to shelter is that it offers little to no protection from the elements. So, if you’re looking for something that’s more durable and will offer better protection from the elements, then you’ll want to opt for either a wickiup or a cabin shelter.
Wickiups Shelter
A wickiups shelter is made from poles and branches that are tied together and then covered with a tarp or other waterproof material. These shelters offer much more protection from the elements than a lean-to shelter and can also be built with minimal supplies. However, they’re not as durable as a cabin shelter, and they may not last as long.
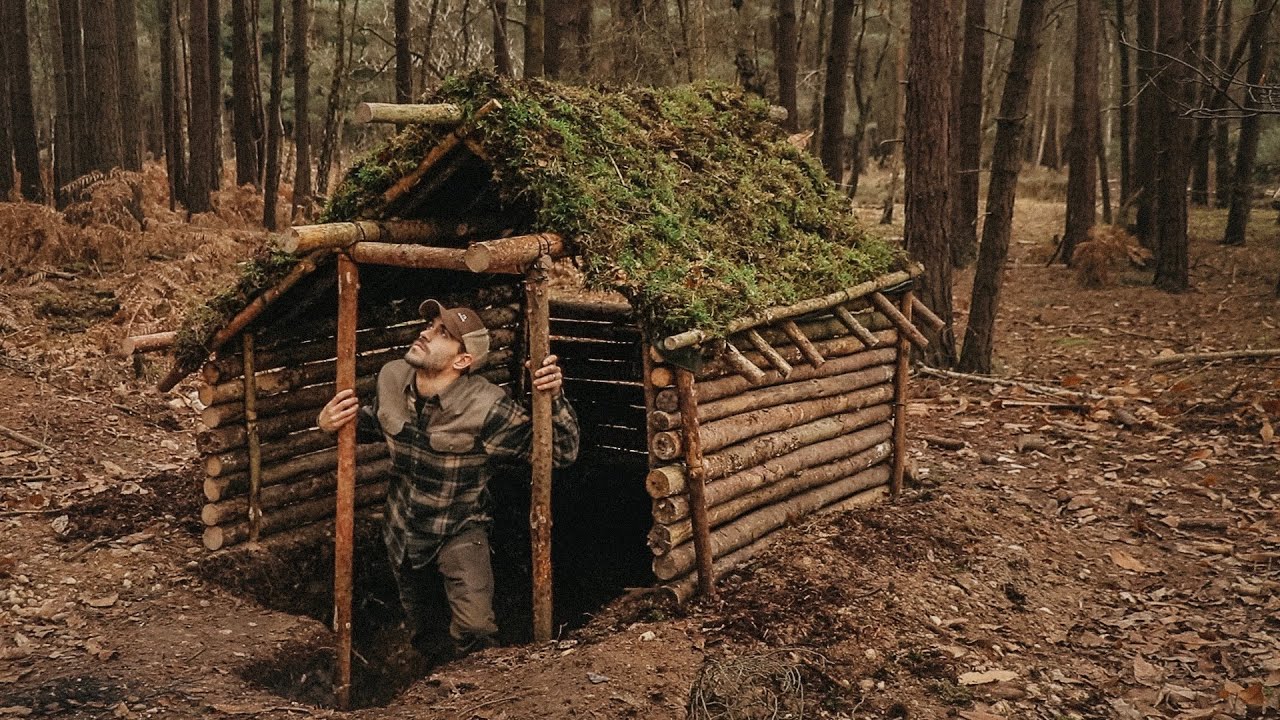
Cabin Shelter
A cabin shelter is the most durable and long-lasting of the three types of shelters. It’s made from logs and other materials and offers the best protection from the elements. The only downside to a cabin shelter is that it’s more expensive and can take longer to build than the other two types of shelters.
Once you’ve decided on the type of shelter you’d like to build, you can start collecting the materials and tools you’ll need to build your permanent shelter in the woods. With these steps in mind, you’re now ready to start building your own permanent shelter in the woods!
Snow cave shelter
A snow cave is a shelter dug out of the snow. It is created by digging a hole into a snowdrift or bank and then hollowing out the interior. The walls, ceiling, and floor of the cave should be thick enough to provide a good thermal barrier from the cold. The entrance to the cave should be just large enough to allow the user to enter and exit with ease.
The best snow caves are made with a combination of shovels, saws, and axes. The shovel will be used to move the snow around and dig the initial hole. The saw will be used to cut blocks of snow and build the walls and ceiling of the cave. The axe will be used to shape and even out the inside of the cave.
Once the snow cave is built, the user should insulate it with a variety of materials. This could include blankets, sleeping bags, or any other material that can provide insulation. It is also important to line the walls and ceiling with snow to further insulate the cave.
A snow cave shelter can provide a great deal of shelter and warmth in the winter. They are relatively easy to make and can be used in snowy conditions. For those who enjoy spending time in outdoors during the winter, a snow cave is a must-have shelter.
Shipping container home
Shipping container homes are becoming increasingly popular as a viable and affordable housing option. With a growing trend in sustainable living, shipping containers offer a unique and creative way to create a home. With the use of recycled materials, shipping container homes are an eco-friendly solution to the housing crisis.
The use of shipping containers for housing first began in the early 2000s, but due to their affordability and versatility, the idea has become increasingly popular. Shipping containers are a great option for those who are looking to build a home without a large budget. The containers offer a great deal of flexibility in terms of size and design, allowing for a wide range of possibilities.
The most common type of shipping container home is a modified container. This type of home consists of a standard shipping container that has been modified to fit the homeowner’s needs. This type of modification can include adding windows, doors, and other features to create a living space.
The second type of shipping container home is a prefabricated home. This type of home is prefabricated in a factory and then shipped to the site and assembled on-site. This type of home offers many benefits, such as being able to customize the home to fit your needs and being able to move it if needed.
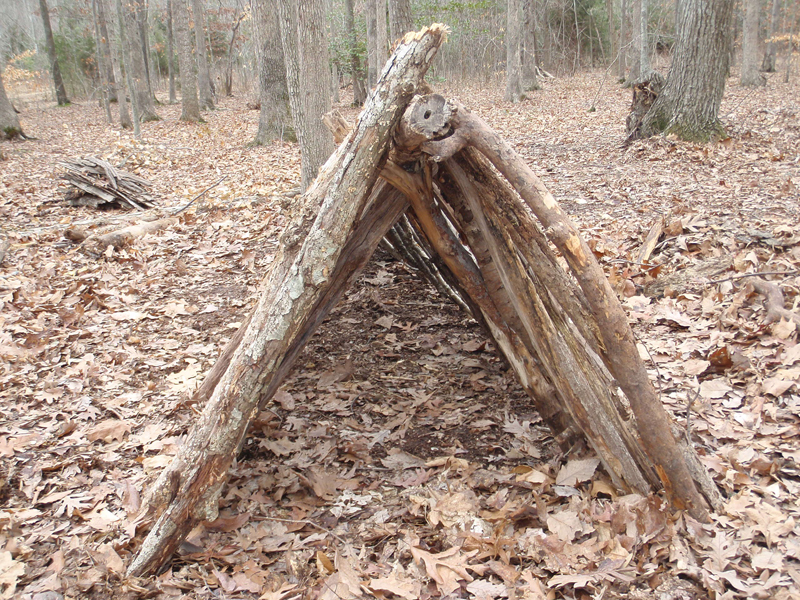
How do you make a simple A-frame Tarp shelter?
Making an A-frame tarp shelter is an easy and straightforward way to make a secure and comfortable shelter outdoors. Whether you’re camping, hiking, or just need a place to take a break on a day hike, an A-frame shelter provides a great way to protect yourself from the elements.
To make an A-frame shelter, you’ll need a few basic supplies: two poles of equal length, some cordage, and something to use as a covering. The poles should be long enough to form an A-frame shape when placed in the ground, with one pole on each side. To secure the poles in place, use the cordage to tie a loop around the poles and then tie the loop off securely at the top.
Once the poles are secured, next comes the covering. This can be a tarp, blanket, or even a piece of fabric. The covering should be big enough to cover the entire A-frame structure, including the sides and top. Secure the covering to the poles using cordage or tent stakes.
Finally, add a piece of fabric or tarp to the entrance of the A-frame shelter. This will provide privacy and help keep out the cold and wind. To complete the shelter, add a fire pit and some kindling, and you’re ready to enjoy the outdoors in comfort!
Making an A-frame shelter is a great way to stay warm, dry, and comfortable in outdoors. With just a few simple supplies, you can quickly and easily set up a secure and comfortable shelter that will keep you protected from the elements. Give it a try the next time you’re out in the wilderness and enjoy the great outdoors even more!
How do you secure a tarp over A-frame?
Securing a tarp over an A-frame can be a challenging task. A-frame structures, such as those often used for camping, come in various shapes and sizes, making it difficult to find a tarp that fits your structure perfectly. Additionally, when you are trying to keep the tarp in place, you must factor in the wind, rain, and other elements that can cause the tarp to slip or move.
Fortunately, there are a few tips and tricks you can use to ensure your tarp stays in place over your A-frame.
1. Choose the Right Tarp
When selecting a tarp for your A-frame structure, you need to make sure that you get one that fits your frame securely. It should be slightly bigger than the frame itself so that you can pull it taut and secure it with ropes or bungee cords. The tarp should also be made of a material that is strong enough to withstand strong winds, heavy rains, and other elements.
2. Choose the Right Location
When setting up your A-frame and tarp, it’s important to choose the right location. Opt for a spot that is protected from the wind and rain, such as in the trees or behind a hill. This will help you ensure that the tarp is secure and won’t move or slip.
3. Secure the Tarp
Once you have chosen the right tarp and location, it’s time to secure it. You can do this by using ropes or bungee cords to tie the tarp to the frame. Make sure that the ropes or cords are strong and are tied in multiple places to ensure a tight fit.
4. Anchor the Tarp
In addition to tying the tarp to the frame, you should also use tent stakes or other anchors to keep the tarp in place. Place the tent stakes on the ground and attach them to the tarp using rope or bungee cords. This will help ensure that the tarp doesn’t move even in strong winds and heavy rains.
Securing a tarp over an A-frame is not an easy task, but with the right tarp, location, and securing techniques, it can be done successfully. Take the time to choose the right tarp and secure it properly, and you’ll be able to enjoy your A-frame structure for years to come.
Designing a Structure That Will Last Through Any Weather Conditions
In order to ensure your survival, you must know how to design a structure that will last through any weather conditions. You can’t rely on strong winds or heavy rain for structural strength- those things happen all too frequently out there!
In fact, 80% of all house fires occur due to poor infrastructure or negligence in home maintenance. When it comes down to it, fire is just another natural process we are obligated to learn about and accept with caution.
So what makes an effective tent or hut? There are several key features that contribute to its durability and ease of use.
Stability is one of the most important factors in choosing the right equipment. A stable platform from which to work allows you to focus more on other tasks like finding food and water. Also, having access to adequate light and air is crucial if you want to effectively sleep at night.
Another major factor is safety. If someone were to enter your space while you are inside, your gear would be their first target. Strong materials and cleverly designed compartments prevent looting or unintentional use.
And finally, efficiency. An easy-to-manipulate entry system and removable/stackable furniture allow for quick setup and take down.
Choosing Materials Wisely
As mentioned earlier, if you don’t have much money then don’t worry about it! There are plenty of great things that you can pick up secondhand or even free online or at thrift stores.
You don’t need expensive materials to build good shelters. Even though we discussed some expensive options, like canvas tents and tarp systems, they aren’t necessary for every situation.
In fact, many people use more affordable materials such as old blankets or cotton sheets to create effective winter shelters. By choosing appropriate fabrics, you can also reduce the cost slightly.
When shopping for new materials, be aware of how heavy each one is and whether it will keep you warm during colder weather. You want to make sure it has enough warmth for several hours of use without being too thick.
Using Structural Insulation
While not necessarily livable, it is possible to make enough of an insulated tent or lean-to structure that it becomes self-contained and protective for you as the weather. This way, you can safely spend the night without worry!
Structural insulation is designed to keep out heat and moisture. Materials such as polyethylene foam (think plastic wrap) and gel inserts are used to accomplish this.
By using several layers of these materials together, you create an efficient thermal barrier that works like a blanket to keep you warm. And since they’re usually thinner than heavy blankets, there’s less drag when moving around.
This article will talk about some easy ways to make your own structural insulation. Then we’ll look at two great products made from recycled material that could be our new bedside companion tonight.
Adding Windows & Doors
After assessing your situation, deciding if it is safe to stay outside or not, and determining how much food you have left, then it’s time to look at what supplies you currently have. You will want to add up all of the materials needed for protection, such as blankets, tarp material, rope, etc.
Next, you will need to determine where these things can be stored efficiently. For example, many people put their water containers next to their beds so they can access them easily at night. Make sure to factor this into your storage space!
After that, you will need to find or manufacture some kind of cover or window for your protected area. This can be done by either buying one already made or by making your own using plastic sheeting and wood or metal frames.
Once you have those completed, now it’s time to actually build your winter home! Take your time to design and create your room/rooms effectively. Once everything is placed properly, take your time again to pack away any unnecessary items so that it does not get packed together later.
Installing Roof Tiles
While there are many ways to approach making a tarp or lean-to style roof, one of the most important things is rooflines. These can be made out of any material depending on what your budget allows.
Most people use plastic sheeting that they roll up and stick onto the existing structure of the house or tent. This does not work well if you have no starting point for the house like grass or dirt.
Another popular option is using aluminum foil as a roof linger. However, this may not hold up very well over wet weather conditions.
One alternative that we will discuss here is using ceramic tile. These tiles can be placed directly onto an already-built frame or structure and held in place by mortar. Roof tiles are also another way to go as they can be re-sealed with cement if needed later on.
Making Sure You Have Enough Water Storage Capacity
Even if you don’t have enough food to eat, or even if there is no way to transport more supplies, your best bet for surviving a catastrophic event is by finding an area with less human activity.
This will likely mean staying where you are currently located instead of looking for more accessible locations. It also means not leaving unless you have to (more on that later).
Finding an isolated place can be tricky though as most people rely on electricity at home for things like running water showers, refrigeration, and air conditioning. All these things require energy to function so it makes sense to try to survive without them!
Fortunately, survivalists have done this before and created ways to get through the initial days/weeks without those things. Here are some tips about how to make sure you have enough storage capacity for water so you are ready for when the crisis comes.
Creating A Fireproof Shelter
Creating a fireproof shelter can be a daunting task, especially if you’re not sure where to start. Fortunately, there are some steps you can take to ensure your shelter is as fireproof as possible.
The first step is to determine the types of materials that you’ll need for your shelter. Fireproof materials are best for this purpose, as they are designed to resist the effects of extreme heat. Common fireproof materials include steel, concrete, and masonry. You’ll also want to consider using fire-retardant paint and other fire-protective coatings to further protect your shelter from the flames.
Once you’ve chosen the materials you’ll use for your fireproof shelter, it’s important to properly install them. Make sure that the walls are securely fastened, that all seams and joints are sealed, and that all edges are securely sealed. In addition, you should also add fire-retardant insulation to the walls, floor, and ceiling of your shelter to further reduce the risk of fire damage.
Finally, it’s important to remember that a fireproof shelter needs to be properly maintained in order to remain effective. This includes regular inspections and regular maintenance, such as replacing any damaged materials, as well as testing the fire-protective coatings to ensure they’re still effective. Additionally, you should also ensure that any fireproof materials you use are up to code, as they may become compromised if they are not properly maintained.
By following these steps, you can ensure that your fireproof shelter is as safe as possible. With the right materials, installation, and maintenance, you can create a shelter that will provide you and your family with the protection you need in the event of a fire.
Shelter from the Elements
When it comes to protection from the elements, finding the right shelter is essential. Whether you’re camping in the great outdoors, making a home in an urban environment, or simply need a safe place to escape from the wind and rain, having a sturdy and reliable shelter is paramount.
A good shelter can provide much-needed protection from the elements, shielding you from the sun, rain, snow, and wind. It can also provide a sanctuary from external noise and keep you warm on cold days. Depending on the type of shelter you choose, you may even be able to cook, sleep, or store supplies in it.
When selecting a shelter, there are a few factors to consider. For instance, what kind of environment will you be in? If you’re camping, a tent may be the best choice. If you plan to stay in an urban area, a shelter such as a yurt or a cabin may be more appropriate. Additionally, you must consider the size and weight of the shelter. If you’re travelling with a lot of equipment, you may need a larger shelter, while if you’re just hiking, a lightweight tent may be the best option.
When selecting a shelter, it’s important to look for one that will be able to withstand the elements. This means looking for a shelter that is waterproof, wind-resistant, and has good ventilation. Additionally, you’ll want to make sure that the shelter can be set up quickly and easily, and that it has a secure closure system.